
The Lomography Sprocket Rocket - The shooting
I was so keen to start shooting the moment I had this in my hands!
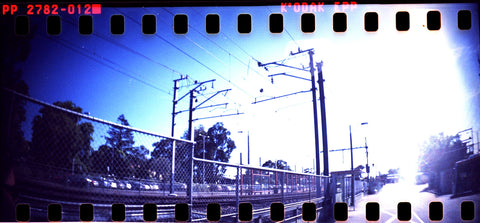
I decided to load it with my Sebastemulsion Toucan 100! A new X-pro slide film I've made!

I was eager to get some example photos from this batch, and was a great chance to pair the two together!
Controls:
I found the dials, switches and rollers all very easy to use. They are all perfectly placed to where your fingers sit whilst holding the camera. There can be quite a few though, that you have to make sure everything is set perfectly before snapping the image.
N/B switch:
I found that this dial can quite easily become switched to the wrong setting by mistake. All that has to be done is the camera turned to the right, and hey presto, it's suddenly gone from Normal to Bulb. The little dial is a tad loose and easily falls to the other side. So you really have to make sure that it's set correctly before pressing the shutter. I had a few frames that were stuck on bulb mode by accident, before I realised and switched it back.

Shutter button:
With the way the camera is held in your hands, your right hand index finger easily reaches to the switch (Unless you are missing your finger....). With this camera though, luckily you can tell which mode you are in, by the noise of the shutter.
N mode has a slightly hollow sounding click.
B mode has the same noise, just not as hollow sounding.
If you're a berk like me, and accidentally switching into the wrong mode; the noise makes it easy to tell which mode it has gone into....sometimes (Unless you're deaf.....)

Focusing:
This is easy as. Just switch between the two focus modes for close up & far away. The focusing is exactly the same as the Lomograhy La Sardina. I personally like it, because I'm lazy. Only have to think of two options, and bam! Then again, after a few drinks I tend to lose focus...of the errr....focus haha.

Aperture switch:
Again. Two options, sunny & cloudy. There's not much difference between the two. However, because it was sunny over the two days I shot the film, I just had to leave it in the sunny mode and snap away!
I think if it get's switched the wrong way by accident, it's not gonna make a huge difference!

Viewfinder:
Does exactly what it says haha. I found the coverage was more or less exactly how the image comes out, which does make it handy for wide shots. However the closer you get to your subject, the less perfect it is. Well it's not a rangefinder for Christ' sakes!

Winding knobs:
Rolling, rolling, rolling.....I don't remember the rest of that song! All you have to do is keep winding until you see the little white dot. But be careful you don't wind too far as it's quite easy to miss the dot, and then before you know it, you've missed one frame. I did this a few times and was a little bummed I missed the chance to shoot more photos.

Flash hotshoe:
Does what it's supposed to.....fires the flash when you press the shutter. I took one photo with the flash and it came out a tad underexposed. Most likely because of an 100 ISO film, and the camera was most likely still in sunny mode.

mX:
It was fun playing around with the multiple exposure switch on this camera! You just have to remember to set the aperture to sunny, so it underexposes slightly. This was the first time I actually got an mX photo I was 100% happy with! Normally they always come out dud for me.

Developing & scanning:
Developing was easy. Just took the finished roll down to the lab and asked for uncut negs!
Scanning is a tad more difficult. Unless you have a dedicated flatbed scanner, that accommodates for film scanning, it's gonna be hard to get some decent photos back from this. Unless you come across a lab that can scan panoramic photos, as well as the sprockets (Re- 90% unlikely in Australia).
Buuuuuuut, if you have an epson V700, it's a piece of cake. You can use the 35mm film holder, but it'll cut off the exposed sprockets (Which does kind of defeat the point of the camera) . So I held it on the very edge of the 120 holder to do the scans. However, it makes the film a bit curly, so it's hard to get a PERECT scan. But the colours come out fine, just needs a little touch up with the contrast on lightroom.

One way to bypass the rigmarole of scanning however, is purchasing the Lomgoraphy film holder. They are made especially for scanning sprockets, and I'm fairly sure its made to be used with the epson V700. Unfortunately I don't own one, so I'll make do with the bootleg scans I did!
So overall I would rate this camera 7/10!
Pro's: Easy to use, wide angle photos, shoots over sprockets, has a pretty cool design look
Cons: Get's stuck in B mode, can be a pain to scan, better suited to film over 100iso
I decided to load it with my Sebastemulsion Toucan 100! A new X-pro slide film I've made!

I was eager to get some example photos from this batch, and was a great chance to pair the two together!
Controls:
I found the dials, switches and rollers all very easy to use. They are all perfectly placed to where your fingers sit whilst holding the camera. There can be quite a few though, that you have to make sure everything is set perfectly before snapping the image.

N/B switch:
I found that this dial can quite easily become switched to the wrong setting by mistake. All that has to be done is the camera turned to the right, and hey presto, it's suddenly gone from Normal to Bulb. The little dial is a tad loose and easily falls to the other side. So you really have to make sure that it's set correctly before pressing the shutter. I had a few frames that were stuck on bulb mode by accident, before I realised and switched it back.

Shutter button:
With the way the camera is held in your hands, your right hand index finger easily reaches to the switch (Unless you are missing your finger....). With this camera though, luckily you can tell which mode you are in, by the noise of the shutter.
N mode has a slightly hollow sounding click.
B mode has the same noise, just not as hollow sounding.
If you're a berk like me, and accidentally switching into the wrong mode; the noise makes it easy to tell which mode it has gone into....sometimes (Unless you're deaf.....)

Focusing:
This is easy as. Just switch between the two focus modes for close up & far away. The focusing is exactly the same as the Lomograhy La Sardina. I personally like it, because I'm lazy. Only have to think of two options, and bam! Then again, after a few drinks I tend to lose focus...of the errr....focus haha.

Aperture switch:
Again. Two options, sunny & cloudy. There's not much difference between the two. However, because it was sunny over the two days I shot the film, I just had to leave it in the sunny mode and snap away!
I think if it get's switched the wrong way by accident, it's not gonna make a huge difference!

Viewfinder:
Does exactly what it says haha. I found the coverage was more or less exactly how the image comes out, which does make it handy for wide shots. However the closer you get to your subject, the less perfect it is. Well it's not a rangefinder for Christ' sakes!

Winding knobs:
Rolling, rolling, rolling.....I don't remember the rest of that song! All you have to do is keep winding until you see the little white dot. But be careful you don't wind too far as it's quite easy to miss the dot, and then before you know it, you've missed one frame. I did this a few times and was a little bummed I missed the chance to shoot more photos.

Flash hotshoe:
Does what it's supposed to.....fires the flash when you press the shutter. I took one photo with the flash and it came out a tad underexposed. Most likely because of an 100 ISO film, and the camera was most likely still in sunny mode.

mX:
It was fun playing around with the multiple exposure switch on this camera! You just have to remember to set the aperture to sunny, so it underexposes slightly. This was the first time I actually got an mX photo I was 100% happy with! Normally they always come out dud for me.

Developing & scanning:
Developing was easy. Just took the finished roll down to the lab and asked for uncut negs!
Scanning is a tad more difficult. Unless you have a dedicated flatbed scanner, that accommodates for film scanning, it's gonna be hard to get some decent photos back from this. Unless you come across a lab that can scan panoramic photos, as well as the sprockets (Re- 90% unlikely in Australia).
Buuuuuuut, if you have an epson V700, it's a piece of cake. You can use the 35mm film holder, but it'll cut off the exposed sprockets (Which does kind of defeat the point of the camera) . So I held it on the very edge of the 120 holder to do the scans. However, it makes the film a bit curly, so it's hard to get a PERECT scan. But the colours come out fine, just needs a little touch up with the contrast on lightroom.

One way to bypass the rigmarole of scanning however, is purchasing the Lomgoraphy film holder. They are made especially for scanning sprockets, and I'm fairly sure its made to be used with the epson V700. Unfortunately I don't own one, so I'll make do with the bootleg scans I did!
So overall I would rate this camera 7/10!
Pro's: Easy to use, wide angle photos, shoots over sprockets, has a pretty cool design look
Cons: Get's stuck in B mode, can be a pain to scan, better suited to film over 100iso